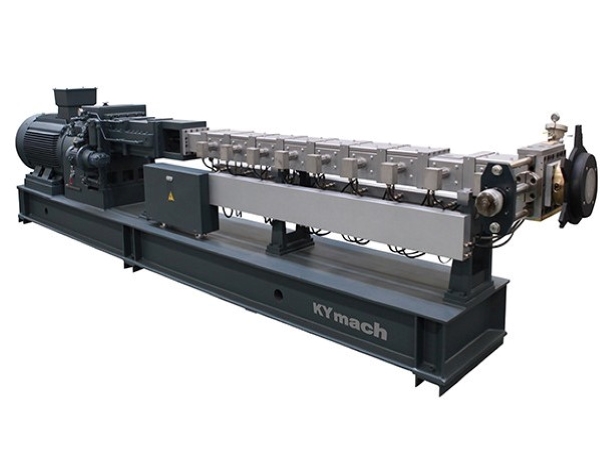

The components of twin screw extruder are similar to those of single-screw extruder. The difference between them is that twin screw extruder has two screws inside the barrel, and the feeding section uses a spiral force to feed materials into the barrel. The specifications and arrangement of the bearings for the screws are more complex.
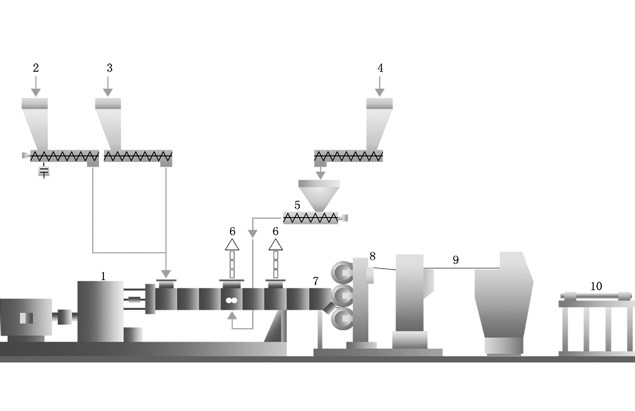
The auxiliary equipment of twin screw extruder includes wire pay-off device, straightening device, preheating device, cooling device, traction device, meter counter, spark tester, and wire take-up device. The selection of auxiliary equipment depends on the specific purpose of the twinscrew extruder, such as cutter, dryer, and printer.
There are various types of screw structures in the twin screw extruder classification, including screws with different helix directions and screws that combine different screw elements. According to the thread part composition and the screw shape, there are multiple types. The screw can be classified into integral screw and composite screw.
Integral screw
It can be divided into cylindrical screw with the same outer diameter of the thread section and conical screw with gradually decreasing outer diameter. The cylindrical screw is further divided into screws with gradually decreasing pitch from the feeding section to the homogenizing section and screws with the same pitch but a gradually increasing thread width from the feeding section to the homogenizing section.
Composite screw
It refers to the screw composed of several different screw units with different shapes. These screw units are installed on a shaft with a long key or assembled on a hexagonal core shaft, becoming a screw for extruding plastic. The composite screw is commonly used for the co-rotating twin screw structure.
According to whether the axis of the two screws is parallel or not, twin screw extruders can be divided into cylindrical screw with the same diameter and the parallel axis of the two screws after assembly, and conical screw with gradually changing diameter and non-parallel axis of the two screws after assembly.
To select the appropriate head size according to the type and size of the product and install the head in the following order:
The head should be assembled and installed on the twin screw extruder as a whole.
Before installing the head, wipe off the grease applied during storage, check the surface of the mold cavity for any impact, scratches or rust spots, polish it if necessary, and then apply a layer of silicone oil on the flow channel surface.
Assemble the various plate blocks of the head in order, apply high-temperature grease on the threads of the bolts, and then tighten the bolts and flange plates.
Place the porous plate between the head flanges to ensure that the porous plate is compressed without overflow.
Adjust the level position of the die before tightening the head connection flange bolts. The square head can be leveled by the horizontal level, and the round head can be leveled using the bottom surface of the forming mold rubber as a reference to level the head mouth bottom.
Tighten the connection flange bolts and the head fastening bolts, install the heating ring and thermocouple, and ensure that the heating ring is in close contact with the outer surface of the head.
Install the forming sleeve, adjust it to the proper position, and check whether the centerline of the mainframe, the forming sleeve, and the traction machine are aligned. After adjustment, tighten the fixing bolts and connect the water pipes and vacuum pipes of the forming sleeve.
Turn on the heating power supply for twin screw extruder, and evenly heat the head and the barrel. At the same time, open the cooling water and exhaust vacuum pump inlet valves of the feed hopper and the gearbox. In the heating process, adjust the temperature of each section to 140°C first, keep warm for 30-40min when the temperature reaches 140°C, and then raise the temperature to the normal production temperature.

 Tel: +86-25-52706155
 E-mail: info@kymach.com
 No.59 West Tianyuan Road, Jiangning, Nanjing, Jiangsu Province, China
 English
  日本語
日本語  한국어
한국어  français
  Español
  русский
  português
  العربية
  中文
中文